Thursday, May 6, 2010

Blog Makeover!

So I was on Little Miss Momma the other day and found this super awesome blog makeover giveaway! If your like me and want a cute blog makeover.... head over here to enter! It’s a great steal for whoever wins! Details:
Custom template - 2 or 3 column
Custom header
Custom coordinating background
Color matching of text, links, post box, and sidebar
Coordinating link/add button with grab code
Image hosting of all graphics included in your design
Installation

THAT'S A $55 value!!!!!!

AND who doesn't want all that?!

Monday, May 3, 2010

Hands to Sleep on...

Ok, I don’t know about you but I have had very little time this week to think about what Im going to do about Mothers Day for my sweet Mother and Mother-in-law! Procrastinator I know... Im so bad but I had no idea what I was going to do. Then I stumbled upon From an Igloo! I said, “Hey I can do that!” So I dragged my boys to the store, grabbed some fabric and had an epiphany! My husband said to me “why don’t you just put them on a pillowcase.” Genius! Why didn’t I think of that! Easy and the pillow is already made for me.... soooooo.... two pillowcases later....

Supplies:

Steps:


Now, the zig zag stitch is intimidating at first! Believe me I was scared! BUT, it really is quite forgiving once you get the hang of it! I suggest that you practice first! To help stay on your lines you can lift up your foot/needle and place the fabric where you want the needle to go. As long as you go slow and watch where the needle is going, you should be fine and come out with a cute stitch! The tips of the fingers were a little hard at first but I repeat, GO SLOW...


My grandma has an embroidery machine... so I think Im going to pay her a visit to do names today! You could also cut out names and repeat steps just like you did with the hands. Anywho, have fun and HAPPY MOTHERS DAY MOM!!!!!

Monday, April 26, 2010

Coming Soon... Pillows and Cakes...


Ok girls! Im workin on it! I've got some cute whip it up in a snap pillowcases coming your way for Mothers Day! (inspired by the beautiful Igloo Momma) Awesome!
AND some cool cake tutorials for you bakers out there.
Im taking classes on cake decorating with some friends from the greatest teacher I know and Im so excited! So tune in! It will be fun.... like my silly face above! Muah!

Wednesday, April 21, 2010

Wrapped Up in Rags.....

Wrapped Up in Rags: by Rachel
The Rag Quilt


Step 1:

Picking your size & material


I think this was the hardest yet fun-nest part for me! We figured out how big I wanted my quilt to be and went from there. I decided to make my squares 13 and a half inches x 13 and a half inches big. (I wanted a HUGE-un-gous quilt...and man I got one!) Just to be safe I got 6 yards of material for each. Ya I so know that is ALOT but you can cater it to the size you wish! Just remember that you’ll be layering them. (you’ll see)

My mother-in-law (bless her!) and I hopped around the fabric stores looking for good deals and cute patterns all day. I settled on yellow! (its my favorite Happy color!)

Flannel works best with these kinds of quilts.


Step 2:
Ripping and Cutting
Now I was a little hesitant when my sister said, “just rip it down the middle to get a straight line!” I thought “Uuurrrr, ya riiiiiiiight?” But come to find out, you really can rip it down the middle and end up with a straight line. It follows what sewers call “on the grain” equalling a straight line. (Or u can cut them all.....eeek!)
When you figure out how big you want to make your squares, simply make a small slit at the top of your material. Grab both ends and rip apart. By the time you get to the end you will have an equal strip of material. All you have to do now is cut them into squares of your desired size.


Step 3
Layer
Layer: Align your squares evenly on top of each other like so. You can have two layers or more. I used 3. You can even layer it with batting in the middle (instead of flannel) if you are so inclined! :) Don’t forget to pin so they don’t fall out of place. (these little squares are just to show you how to do it. I used 13x13 for the quilt)


Step 4
Leave your mark
Draw an X through the middle of your square. This marks where you will be sewing.
Just follow the lines and sew over.


Step 5
The Layout
1) Layout your squares how you want them...


2) Grab edges...


3) Put together...


4) Sew a straight line on edge. 1 inch width...


5) There you have a flap! Whoop Whoop!


6) Repeat steps with next square until you have a row done. Once you have all your rows sewn, lay them out, and match up seams and repeat the process row by row.


Step 6
Going over the bumps in the road
Now your bound to hit a few bumps in the road. Because of these lovely bumps, I actually broke one of my needles (thank heavens for Joanns!)So as you sew over the seams where the material is all bunched together... please go slowly. It reduces your “clumsiness.” A.K.A: “Rachelidiocy.”
Once you get over your bumps, you should have one side of your quilt with flaps and the other with none.

bump

Just go on over it baby! Slowly...


Step 7
Your Border and the Big Cut

Now after you sew all your beautiful pieces together, it’s time to sew a border. Simply go around the border of the quilt and sew edges 1 inch in. Once you have sewn the border, pull out your scissors! It’s cuttin time! Cut all your extra “flaps” and not your seams. BE CAREFUL!


Step 8
Washa Washa Washa...
Once you finish your tedious cutting, throw your blanket in the wash! Viola! Your done!
I do recommend getting spring scissors when cutting all your flaps. They will help save your hands as you cut! You won’t end up with blisters like me! It turns out oh so cute in the end though.... that’s what kept me going! Finished just in time for snuggling with the hubby this weekend!
Let me know how your's goes! Muah!


Thursday, April 15, 2010

Italian Mouthwatering Meatballs

Well I figured I would entertain your mouth since I'm still working on my rag quilt. I'm almost done though! (((((Ooooooooo you so can't wait can you! ;)))))))) I know I can't and Im making it! Oh and Cade is my happy little helper. I guess you could say he's testing the fabric to make sure it's soft enough? :)


Anywho, I made these the other night with my hubby. They are a family favorite and my famous Uncle Micheal (a.k.a. amazing Italian cook!) was so wonderful enough to give me the recipe.
I added some of my own zest to it to spice it up a bit.... not that it needed that, but owell! So have some fun while you make these and enjoy your Italian night on me! Loves!


1 lb ground beef

1 pkg ground spicy Italian sausage

6-8 slices of white bread, cut off edges

2 eggs

1 bunch fresh chopped Italian parsley (leaves only)

1 teaspoon garlic salt

1/4 teaspoon ground black pepper

1/2 cup (or little more) of Romano Grated Cheese


(1) Turn on broiler.

(2) Place tin foil over broiler pan. Press holes, using a knife, so grease will go through pan when meatballs are cooking.
(3) Place meat in a large bowl
(4) Wet (but don't soak) bread ... add to bowl (I just lightly ran the bread under drizzling water to dampen)
(5) Add egg, parsley, garlic salt, black pepper & cheese to bowl
(6) Thoroughly mix with both of your hands. Make sure bread is thoroughly mixed in.

Mixture should not be too wet or too dry.


(7) Form meatballs and place on broiler pan.


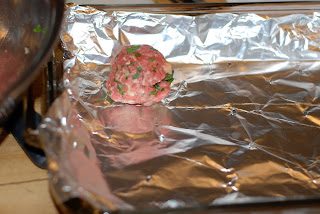
(8) Place broiler pan (I just used my glass pyrex pan) with meatballs on rack of oven. Make sure rack isn't too close to broiler... down 1 or 2 from top.

(9) Cook meatballs for around 10 minutes in broiler, turn meatballs, and cook another 10 minutes.

Serve with your favorite Spaghetti, salad and garlic bread.... yummmmm!
SCRUMP-CHU-LESS-ANT!!!

Sunday, April 11, 2010

What do U want to hear?

Ok ladies, I am currently working on my rag quilt project. (((Ooooo Exciting!!! Tutorial coming soon! Promise!))))

Yet, as I sat here, I started thinking. What do YOU want to hear about? What do YOU want to learn? Do you have any ideas out there?

If so, Id love love love to hear about them!

I hope you have a great week! In the meantime I will be working on "my lil friend" the rag quilt.

:)

LinkWithin

Related Posts with Thumbnails