

Ok ladies! Ever since I can remember I have always wanted to learn how to decorate cakes! Im a nerd like that. Well, Im super excited about this! Im currently taking a cake decorating class from the amaza-za-zing Shaelyn! She is one of a kind (and a wonderful mother-in-law!) and has MANY talents... but the talent that she is sharing with us today is how to decorate a cake! Yumm! She has done many a cake in her day and is incredible! From weddings, birthdays, showers and every day occasions she has made beautiful creations to bless the lives of others! NOW, she is teaching us!
Tools: Cake leveler, Fondant smoother, Straight spatula, Wheel cutter, Non-stick rolling pin, Silicone fondant work mat, Food color paste, cookie cutters, Ingredients for frostings (see below)
So our first order of business!
Make a cake and frosting!
I just used a chocolate store bought cake. Bake it according to directions, let it cool and then wrap in plastic wrap and let sit over night. It helps the cake not to be so crumbly. Little did I know, chocolate crumbles the most, but owell. I worked with it. Next, the frosting... for inside the cake.
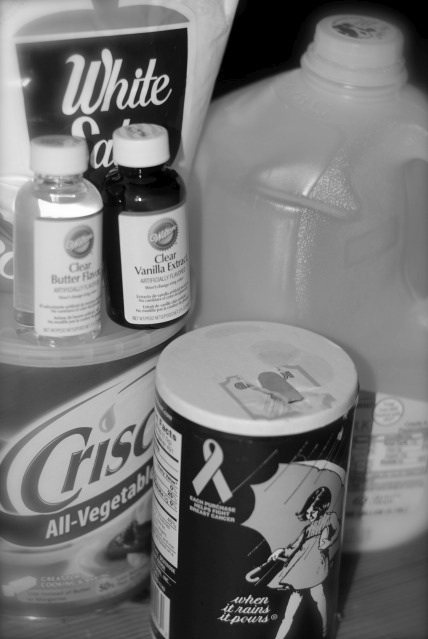
BUTTERCREAM RECIPE:
1 C Crisco
1 tsp clear butter flavor
1 tsp vanilla flavor
1 tsp salt
Mix well with hand mixer, medium setting
Add
2lbs powdered sugar (all at once)
1/2 C milk
start mixing slowly, gradually increasing the speed until high


It’s fondant making time! You will need:
1 pkg Mini Marshmallows
2 Tbs Water
2 lbs Powdered Sugar
(or you can just go buy your own fondant... this recipe tastes much better tho!)


If it’s not very pliable, stick it in the microwave for a few seconds until workable


Round cakes are easier to apply fondant so you may want to start out with a round the first time.


If you have any questions, or would like to share your creations let me know! Now go practice! Happy baking! Oh, and here’s some tips for you about working with fondant. Muah!
TIPS:
*Tip: Rolled fondant is versatile. It can be tinted, flavored, modeled, formed, twisted, imprinted, and shaped into numerous of decorative pieces.
*Tip: Before applying fondant, a "sticky" surface should be applied to the cake which will help the fondant adhere to it. Many spread a thin layer of buttercream before laying out the fondant.
*Tip: When using rolled fondant to make decorations from, roll it to 1/4-inch thick. Either place them flat on greased (use shortening) wax paper or over forms to dry for 24 to 36 hours. Use royal icing to adhere fondant pieces to a rolled fondant iced cake and for the fine decorating commonly used on wedding cakes.
*Tip: The cake to be covered with rolled fondant must be cooled completely, preferably 24 hours, covered. This will tighten the crumbs and make the cake more solid.
*Tip: Fondant dries quickly, so while working with it, always keep excess well-wrapped in plastic, as well as the parts on the cake you are not working on.
*Tip: Once wrapped, unrolled fondant keeps for 1 to 2 months at room temperature. Do not refrigerate or freeze. If it gets too hard, put it in the microwave for a few seconds to soften; it will be easier to knead.
*Tip: To smooth out the fondant once it is put on the cake, use cornstarch on your hands to smooth out the fondant.
*Tip: If tiny cracks appear in the surface of the fondant, knead it a little - the warmth from the kneading or pressure from the rolling pin will make it smooth and satiny. Do not use water to smooth out cracks - water dissolves fondant as it is mostly sugar. Instead, use a bit of shortening on your fingertips to repair small tears.
*Tip: Cracking can also be caused if your fondant is rolled too thick. Fondant is heavy and if not rolled thin enough (1/4-inch thick is usually best) the excess can pull the fondant from the top of the cake causing it to crack.
*Tip: To cover a crack, try rubbing a little of the same Fondant over the crack in a circular motion, then using a smother or your hands to rub it in.
*Tip: Try to work with fondant in a cool room and on a cool surface. A warm room may make the fondant too soft and difficult to work with.
I could eat that right now I think! I have never seen the marshmallow fondant before. One of these days I am going to have a go at that. How fantastic to get some lessons too. I learnt a little about cake decorating at high school since then though its been all books and youtube. :-)
ReplyDeleteThanks
Thank you! It sure is fun! Glad you liked! ;)
ReplyDeleteVery cool! Thanks for sharing.
ReplyDeleteHow did you make the twisted rope looking edge along the bottom of the cake?
I can't read the instructions on a few of the pictures. Could you change the color of the font or something to make it easier to read?
THANKS!!
Such a fun idea to take a cake class via tutorial. I would love to make a cake as beautiful as yours. I am featuring this at somedaycrafts.blogspot.com. Grab my "featured" button.
ReplyDeleteI love this idea!! Gorgeous and the fondant looks like it would taste wonderful - not icky. I retweeted Someday Craft's tweet about this. Wonderful idea!
ReplyDeleteMy 11 year old daughter is an Ace of Cakes fan and wants so badly to decorate a cake with fondant. She has a whole book of cake designs that she has drawn. She will love this! I'm so excited to share this with her.
ReplyDeleteI am super excited to try this fondant. I only frost my cakes because I don't care for the store bought fondant. I bet this tastes yummy! The cakes all turned out GREAT! you all are super talented. Thanks so much for this tutorial.
ReplyDeleteSo Awesome!! Thanks for sharing...bought the stuff to try it a month ago, but didnt know where to start. Thanks so much for giving me step by step instructions. I am headed directly to become a follower. I hope you will come visit me...and follow to. :) thanks again.
ReplyDeleteNiki
http://entertaininstyle.blogspot.com
i just made my first fondant cake... something to make the fondant yummier is to add in invisible kool-aid. great flavor!!! thanks for these great ideas!
ReplyDeletewow I can't wait to try this. Thanks for sharing!
ReplyDeleteThanks guys for all the comments! Oh and to make the rope at the bottom base, you simply take a little piece of fondant, roll it out in between your hands like your making a snake( or like your trying to warm your hands:). In the end you will have a long piece of "string". Repeat with another color. Then, take your long pieces of "ropes", lay them side by side and twist them together until they start to look like licorice. :) Any questions??? Let me know. Im going to do some more tutorials on how to make borders, piping, making characters and more so stay tuned!!!!! :) Hope that helps! Muah!
ReplyDeleteI want a turn at this one. I'll have to set up a day in my kitcxhen for this.
ReplyDeleteHey Rachel, I just used your tutorial to make Reagan's birthday cake. Your instructions were really easy to follow. I have NEVER attempted a cake like this, so thanks for the info. I don't have any of the special tools you used, but I really like how it turned out.... couldn't have done it without you. By the way... maybe I'm dumb, but I couldn't get my fondant to fall perfectly over my round cake. I had to pinch a few corners just like you did on your square cake. Did I miss something? Miss you!
ReplyDeleteKristina! I'm so happy you tried this! It really is easy and fun! It takes some time but with practice, you get better. As for ROUNDS. Rounds are harder to lay fondant on. There's a lot of smoothing required so be patient. Also, the smaller the cake, the harder it is too. FYI. So no, you didn't miss anything. You just have alot of smoothing to do. :)
ReplyDelete